Monday, July 4, 2011

Ultimate Banana Bread


Oh banana bread, how I love thee... my family never baked much when I was growing up so the few things that we did have hold great nostalgia for me. Obviously this is one of them. Being a quick bread, banana bread is so easy to put together. The best part is that it gives your rotting banana's a new purpose other than retiring to the garbage can. However! This is not the recipe that I grew up on, which was the basic recipe that I am sure most of us know and love. This is a Cook's Illustrated baby. If you are at all familiar with Cooks Illustrated you would know that they like to test things a million times until they come up with the best recipe and technique of making something the best. I trust them very much because of this. Now certain things they come up with mean taking a simple, easy recipe, and making it more complicated. This is one of those recipes.


The usual quick bread is transformed into something a bit more labor intensive in order to increase the banana flavor to a whole new level. They steam banana's in the microwave and take the extracted juice and make it into a reduction of concentrated banana flavor. Crazy, right? I thought so. I had to try it.


Now, I haven't made banana bread in a very very long time, so I can not honestly say if this had more banana flavor then the regular loaf. The flavor was definitely there though. I especially enjoyed the moisture and lightness of the bread. I feel like sometimes with the other loaf, it can be kind of dense and gummy. Sometimes even tasting like baking soda. This didn't have any of this. It was light and moist and  had plenty of banana flavor. If you are willing to take the extra effort because you're a banana bread enthusiast, I would definitely go to town making this bread. If nothing else, the technique is really interesting. I think next time I will make the regular recipe I use and report back to you on how it compares in banana flavor. I'll keep you posted, but in the meantime check this out for yourself.


Ultimate Banana Bread
adapted from Cook's Illustrated


  • 1 3/4cups (8 3/4 ounces) unbleached all-purpose flour
  • 1teaspoon baking soda
  • 1/2teaspoon table salt
  • 6large very ripe bananas (about 2 1/4 pounds), peeled (see note)
  • 8tablespoons (1 stick) unsalted butter , melted and cooled slightly
  • 2large eggs
  • 3/4cup (5 1/4 ounces) packed light brown sugar
  • 1teaspoon vanilla extract
  • 1/2cup walnuts , toasted and coarsely chopped (optional)
  • 2teaspoons granulated sugar


  1. Adjust oven rack to middle position and heat oven to 350 degrees. Spray 8½ by 4½-inch loaf pan with nonstick cooking spray. Whisk flour, baking soda, and salt together in large bowl.
  2. Place 5 bananas in microwave-safe bowl; cover with plastic wrap and cut several steam vents in plastic with paring knife. Microwave on high power until bananas are soft and have released liquid, about 5 minutes. Transfer bananas to fine-mesh strainer placed over medium bowl and allow to drain, stirring occasionally, 15 minutes (you should have ½ to ¾ cup liquid).
  3. Transfer liquid to medium saucepan and cook over medium-high heat until reduced to ¼ cup, about 5 minutes. Remove pan from heat, stir reduced liquid into bananas, and mash with potato masher until fairly smooth. Whisk in butter, eggs, brown sugar, and vanilla.
  4. Pour banana mixture into flour mixture and stir until just combined with some streaks of flour remaining. Gently fold in walnuts, if using. Scrape batter into prepared pan. Slice remaining banana diagonally into ¼-inch-thick slices. Shingle banana slices on top of either side of loaf, leaving 1½-inch-wide space down center to ensure even rise. Sprinkle granulated sugar evenly over loaf.
  5. Bake until toothpick inserted in center of loaf comes out clean, 55 to 75 minutes. Cool bread in pan on wire rack 15 minutes, then remove loaf from pan and continue to cool on wire rack. Serve warm or at room temperature.

    METHOD


  6. 1. EXTRACT JUICE
    Microwaving ripe bananas for 5 minutes causes them to release “juice.”
  7. 2. STRAIN IT OUT
    After straining the bananas, you should have 1/2 to 3/4 cup of liquid to work with.
  8. 3. REDUCE THE JUICE
    Reducing the banana liquid yields a concentrated liquor, intensifying flavor without making the loaf wet.

Saturday, July 2, 2011

This Weeks Delish: July 2, 2011

3 weeks until we start our move to Germany! It's getting harder and harder to find time to make stuff in the kitchen. I"ve been managing it though! Next week, I'l have lot's of leftover 4th of July stiff to share- stay tuned. 

  • oh goodness, who doesn't adore red velvet cake? These Red Velvet Brownies with White Chocolate Frosting sound scrumptious! Plus if you put some blueberries on top, you've got a red, white and blue dessert! 
  • How many times have I mentioned my serious love affair with s'mores... too many. So here we go again- S'mores Cheesecake  = LOVE
  • Guacamole is one of my favorite things to serve at get togethers. Most of you are aware that it's not a low calorie dip.... this broc-a-mole is a fantastic take on the classic dip.
  • Another great dip recipe- the dill dip in the bread bowl... looooove it! Here is a recipe using greek yogurt, a great healthful approach.
  • Fruit desserts are summery, very appropriate. This Peaches and Cream Cake is right up that alley!

This Weeks Pick:


I absolutely have to go with my flag cake. It was AWESOME. Not only was it super trippy with the flag layer design... but it was super super super delicious! Frosting and cake. So even if you don't want to do the whole design thing, please make this cake.


Friday, July 1, 2011

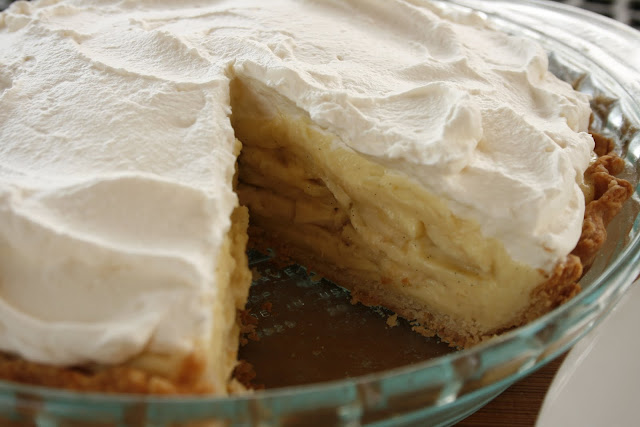
Banana Cream Pie


I've never had banana cream pie before, so obviously I have never made it before either. I was up for the challenge though since this pie is seemingly the favorite of so many people, especially down here in the South. It's hard for me to fairly judge this pie however since I am not a fan of pastry cream or bananas. I like them well enough, but they are not my favorite.


I've got to say- I executed this pie perfectly. The crust came out flaky and crisp. The pastry cream was not overly stiff or a pile of goo. The topping held up perfectly in the fridge for two days without weeping. Damn, I'd say I did a pretty good job with this pie. And it certainly was good. I can't say it was my favorite thing that I have ever made or the best banana cream pie out there, but take into account the fact that I don't usually like pastry cream or banana's.


With that said, if you are a banana cream pie, you will love this pie. It was very good and I was impressed with how each component (the pie crust, the filling, and the topping) came out delicious and complemented each other perfectly. I will say, I did two things differently than the recipe dictates. I omitted the whole graham cracker crumbs on the pie crust thing, although I do think that it is a good idea. I also added gelatin to my whipped topping to aide in the stability and thickness of it. If you are planning on serving all of the pie at once without saving any for the next day then this isn't necessary. However, if that's not the case, you will either want to stabilize your whipped cream or make some fresh when you serve it up each time. Whipped cream will not store well because the liquid separates as it sits which is called "weeping" in this case. It's pretty yucky. SO! you have a few choices- if you can find "whip it" at your grocery store, then just add that to your cream before you start whipping the cream (it's a commercially made stabilizer). You can also use cornstarch but I frown on that because of the alter in taste and texture. I believe gelatin to be the next best option. Take I Tb of cold water and mix 1 tsp unflavored gelatin- let it sit a minute to dissolve. Pop it into the microwave for 10-30 second or until it dissolves. It only took my microwave 10 seconds, but it was about to boil over, so watch it. Then after you add the sugar once the cream starts to peak, you add the gelatin and vanilla. Here is my basic recipe for that:

Stabilized Whipped Cream

1 Tb cold water
1 tsp unflavored gelatin
1 cup heavy cream, cold
3 - 4 Tb confectioner's sugar (I use 4 Tb, which = 1/4 cup)
1 tsp vanilla extract

Place cold water in small bowl and sprinkle gelatin on top and let sit until dissolved (about 1 minute). Microwave 10-30 seconds or until melted, watching all the while so it doesn't overflow. Whip cream until it starts to make ribbons and thicken. Add confectioners sugar and whip until distributed. Add gelatin then vanilla, whip until medium peaks are achieved.


Banana Cream Pie
adapted from Cooks Illustrated


  • Graham Cracker Coated Pie Shell
  • 1 1/4cups unbleached all-purpose flour
  • 1/2teaspoon table salt
  • 1tablespoon granulated sugar
  • 6tablespoons unsalted butter , chilled, cut into 1/4-inch pieces
  • 4tablespoons vegetable shortening , chilled
  • 3–4tablespoons ice water
  • 1/2cup graham cracker crumbs
  • Banana Cream Filling
  • 1/2cup granulated sugar , plus 2 tablespoons
  • 1/4cup cornstarch
  • 1/8teaspoon table salt
  • 5large egg yolks , lightly beaten
  • 2cups milk , whole or 2 percent
  • 1/2cup evaporated milk
  • 1/2vanilla bean , about 3-inches long, split lengthwise
  • 2tablespoons unsalted butter
  • 1teaspoon brandy or more to taste
  • 2medium bananas
  • Whipped Cream Topping
  • 1cup heavy cream
  • 2tablespoons confectioners' sugar
  • 1/2teaspoon vanilla extract


  1. For the Crust: Mix flour, salt, and sugar in food processor fitted with the steel blade. Scatter butter pieces over mixture, tossing to coat butter with a little of the flour. Cut butter into flour with five one-second pulses. Add shortening; continue cutting in until flour is pale yellow and resembles coarse cornmeal, with butter bits no larger than a small pea, about four more one-second pulses. Turn mixture into medium bowl.
  2. Sprinkle 3 tablespoons of the water over mixture. Using rubber spatula, fold water into flour mixture, then repeatedly press down on dough mixture with broad side of spatula until dough sticks together, adding up to 1 tablespoon more water if dough will not come together. Shape dough into ball with hands, then flatten into 4-inch wide disk. Dust lightly with flour, wrap in plastic, and refrigerate 30 minutes before rolling.
  3. Generously sprinkle 18-inch work area with 2 tablespoons graham cracker crumbs. Remove dough from wrapping and place in center of work area. Scatter a few more crumbs over disk top. Roll dough from center to edges to make 9-inch disk, rotating a quarter turn after each stroke and sprinkling additional crumbs underneath and on top, as necessary, to heavily coat dough. Flip dough and continue to roll, without rotating, into 13-inch disk just under 1/8-inch thick.
  4. Fold dough in quarters, then place dough point in center of 9-inch Pyrex pie pan. Unfold dough to cover pan completely, with excess dough draped over pan lip. Trim and flute crust, (see illustrations 1-4 below).
  5. Refrigerate dough until firm, about 30 minutes. Prick shell at 1/2-inch intervals to keep dough from ballooning during baking, (illustration 5). Press a doubled 12-inch square of aluminum foil inside pie shell. Prick foil to prevent further ballooning. Refrigerate to let dough relax, at least 30 minutes longer.
  6. Adjust oven rack to lowest position and heat oven to 400 degrees. Bake, checking occasionally for ballooning, until crust is firmly set, about 15 minutes. Reduce oven temperature to 350 degrees, remove foil, and continue to bake until crust is crisp and golden brown in color, about 10 to 15 minutes longer. Transfer to wire rack and cool completely.
  7. For the Filling: Whisk sugar, cornstarch, and salt in medium saucepan. Add yolks, then immediately but gradually whisk in milk and evaporated milk. Drop in vanilla bean. Cook over medium heat, stirring frequently at first, then constantly as mixture starts to thicken and begins to simmer, 8 to 10 minutes. Once mixture simmers, continue to cook, stirring constantly, for 1 minute longer. Remove pan from heat; whisk in butter and brandy. Remove vanilla bean, scrape out seeds, and whisk them back into filling.
  8. Pour filling into shallow pan (another pie pan works well). Put plastic wrap directly over filling surface to prevent skin from forming; cool until warm, about 30 minutes. Pour half the warm filling into pie shell. Peel and slice the bananas on top of half the filling and top with remaining filling. Once again, place sheet of plastic wrap directly over filling surface. Refrigerate pie until completely chilled, at least 3 hours.
  9. Whip cream to soft peaks. Add confectioner's sugar and vanilla; continue to whip to barely stiff peaks. Spread over filling and refrigerate until ready to serve.

Thursday, June 30, 2011

Guacamole


I absolutely LOVE guacamole. The funny part is that I didn't even know that it was something you could make from scratch... ha I always thought guacamole was made from those envelopes of seasoning mixes. Shame on me. Guacamole is SO much better when homemade. That packet stuff doesn't even hold a candle to the real stuff. Of course at the time when I thought that "that" was the real stuff, I thought guacamole was pretty good anyways. Seriously though, if you are in the same boat I was in, you need to try and make your own...

It's very, very, verrrry easy!

Squash a few avocados.

Squeeze in some lemon juice. A couple dashes of hot sauce.

Dice a tomato and half an onion. Mince a clove of garlic.

Season. Done.

Ammmmmazing!


Guacamole
adapted from "The Barefoot Contessa Cookbook" by Ina Garten

4 ripe haas avocados
3 Tb freshly squeezed lemon juice (1 lemon)
8 dashes hot pepper sauce
1/2 cup small dice red onion
1 large garlic clove, minced
1 tsp salt
1 tsp pepper
1 medium tomato, seeded, and small diced

Cut the avocados in 1/2, remove the pits, and scoop the flesh out of their shells into a large bowl. Immediately add the lemon juice, hot pepper sauce, onion, garlic, salt, and pepper and toss well. Mash or slice avocados down to desired consistency for dip. Add the tomatoes. Mix well and taste for salt and pepper.


Wednesday, June 29, 2011

Espresso Cheesecake Brownies


I've been wanting to make these ever since I saw them in Dorie Greenspans' book. I LOVE chocolate coffee combos! I definitely favor that over PB and chocolate anyday... I know, crazy. Just my preference I guess.


So, let me just tell you about these brownies. They were good. Now, I actually ended up overbaking them, so they are probably great, but mine were just good. When I make them again, I am definitely going to be more careful with the time that they are in the oven. Although it wasn't my fault... my husband shut off the timer on accident so I had to guestimate where they were at. I guestimated wrong...haha


Seriously though, I am overall very happy with this recipe, especially since it was super easy to make. The cheesecake portion was still delicious even though it was overbaked. I will for sure be trying this again. 


I didn't put the sour cream topping over the whole thing because I didn't have enough sour cream, but man, was it delicious!


Espresso Cheesecake Brownies
adapted from "Baking: From My Home toYours" By Dorie Greenspan
Print Recipe


For the Brownies:
1/2 cup all purpose flour
1/4 teaspoon baking powder
pinch of salt
5 tablespoons unsalted butter, cut into cubes
4 ounces bittersweet chocolate, chopped
1/3 cup sugar
2 large eggs
1/2 teaspoon vanilla extract

Preheat the oven to 350 F, with a rack in the center. Butter a 9" square baking pan placed on a baking sheet and set aside.

Whisk together the first three ingredients. Put the butter and chocolate over a double boiler with water simmering. Stir until the ingredients melt, but don't overheat so that the butter separates. Remove the top of the double boiler and set aside.

Stir the sugar into the chocolate mixture with a whisk, then add the eggs one at a time. Beat well after each egg, then beat in the vanilla. Next, gently stir in the dry ingredients until they disappear. Set aside.

For the Cheesecake:

1 1/2 teaspoons instant espresso powder dissolved in 1 tablespoon boiling water
8 ounces cream cheese, at room temperature
2/3 cup sugar
1/2 teaspoon vanilla extract
2 large eggs
1/4 cup sour cream
1 tablespoon all purpose flour

Allow the espresso to cool to tepid. With a stand mixer fitted with the paddle, beat the cream cheese on medium until it's completely smooth. Add the sugar and continue to beat for 3 minutes more. Beat in the vanilla and espresso before adding the eggs one at a time. Beat for 1 minute after each egg, then reduce the speed to low and add the sour cream, then the flour. The batter should be smooth.

Pour about 3/4 of the brownie mixture into the prepared pan. Smooth it out, then pour the cheesecake layer over the top, taking care to make it even. Place spoonfuls of the rest of the brownie batter on top, and use a knife to swirl the dark and light batters together. Be careful, however, not to plunge the knife into the base brownie layer. Swirl only as much as necessary.

Bake for around 30 minutes. The brownies should come away from the sides of the pan. The cheesecake will puff and turn lightly browned around the edges. Transfer the pan to a wrack to cool. Once it reaches room temperature, refrigerate for at least 2 hours, until well chilled.

For the Topping:

1 1/4 cups sour cream
1/2 cups confectioners' sugar

Warm the sour cream and sugar in a small saucepan over very low heat. You need to stir constantly until the sugar is dissolved. Pour over the chilled brownies, then return them to the refrigerator and chill for at least another hour. Cut the brownies into squares and serve.