Saturday, April 30, 2011

Homemade Olive Oil Butter


There are SO many reasons you should make your own butter! The most important being that YOU made it. I think that whenever you can make something from scratch the end product is almost always better than the prepackaged version. Not only is it usually more delicious, but you know exactly what went into it- no preservatives, no gums, no colors or dyes. Plus with butter, you can go organic for half the price of buying it from the store. I made homemade butter for the first time a couple weeks ago and was amazed at how easy it was to do. If you have 15 minutes, some heavy cream and a mixer, you can make homemade butter. Well, I thought it was so fantastic that I decided to take it one step further and create a homemade olive oil butter : ) I wanted to create a replacement for those butter spreads you can buy at the store which claim to be made with certain oils or added good fats. If you ever take a close look at those, almost always the first ingredient listed is water. For those of you that don't know, they list ingredients on packages in order of how much of that ingredient is used in the product. In this case, water is the ingredient that is used in the largest quantity in butter spreads. The oil blend they use is usually some compilation of soy and vegetable oils. By making an oil butter spread yourself you can control how much and what kind of oil is in the butter. You don't even need to used olive oil, you can use canola oil for a less distinct flavor or a different blend of fats. You can use more or less oil depending on your preference for taste and consistency. What I want to do for you is show you how this can be done by giving you a short tutorial on butter making and an outline of a recipe for olive oil butter that I came up with. The beauty of it is that you can adjust it to your liking as I mentioned above. Just remember, this is a butter "spread" meaning that you should NOT be using it in baking. It is primarily meant for spreading on breads or vegetables. Although you could probably use it to saute as well. Also, be warned that this is not a "diet" or "low calorie" butter spread. It is simply a way to bump up the nutrition in homemade butter without losing the taste. Don't be intimidated either. I promise, this is easy! And it is so worth your 15 minutes. So let's begin!

Have you ever whipped heavy cream before? Now start the same way, but let's overbeat that cream and make some delicious butter!

Pour two cups of heavy cream in the bowl of a mixer and start to beat on high with whisk attachment.


This is usually about where you would stop for a stiff whipped cream, now let's keep beating...


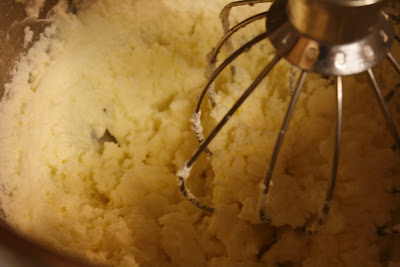
Now it's getting thick and lumpy... keep going!!


Here we go- you should start to see some curds develop. Not there yet though, keep going!


Aha! The butter fat solids are separating. If you lift up the whisk you should see...


a pool of buttermilk! Detach the bowl from the mixer and dump out the buttermilk carefully, making sure to not lose any butter solids. Put the bowl back on the mixer and keep going!


Alright, here we go, now the butter solids have come together around the whisk. Dump the buttermilk again and start beating the butter solids once more, dumping and beating until no more buttermilk appears.


If you have beaten all the buttermilk out of the solids you are now ready to switch to a paddle attachment and cream in some oil. On medium-low speed, cream in 2 Tb of oil, pouring slowly into the bowl in a steady stream. Add salt if desired. The result will be a beautifully creamy butter. 


Scrape the butter into a container of your choice. Now spread it on some bread and enjoy the bliss!!
The spread will harden in the refrigerator so if you want a spreadable consistency, you'll have to bring it out of fridge and leave it at room temperature when desired. 


Homemade Olive Oil Butter
Yield: approximately 1 cup


2 cups heavy cream (organic for organic butter)
2 Tb extra virgin olive oil (or a different oil of your choice; you can also add more oil if desired, just add it slowly so you don't accidentally make oil soup).
3/4 tsp salt (optional, add as much to as little as you want. I like this range though)

1.) Pour 2 cups heavy cream in the bowl of a stand mixer fitted with a whisk attachment. Start beating the cream on low, bringing it up to high. Continue beating until curds develop and butter solids start separating from buttermilk. Pour off buttermilk from the bowl and continue to beat and pour until no more buttermilk develops (whole process should take 7-9 minutes). *
2.) Switch to paddle attachment and begin to cream butter. Slowly, in a steady stream, add 2 Tb of olive oil (feel free to add more or less to your liking). Add salt, if desired. You should be left with a creamy butter spread.

*Be careful, the mixture sloshes quite a bit once the buttermilk separates. I usually place a kitchen towel over the mixer once this begins.

Friday, April 29, 2011

Pappa al Pomodoro


This recipe is fantastic!! I love making soups, I think it's a wonderful way to get a load of vegetables into your diet. Even my husband adores this soup and he is extremely picky. I thought the recipe sounded funny at first because it was served with croutons on top. The more I thought about it though, the more I realized how not weird it was. We put crackers in our soup, why not croutons? Well, I don't think I will have soup any other way now- it is SO good! And how clever to add bread to thicken a soup, especially if you have leftover bakery bread hanging around. I've used french and italian bread before too and it works perfectly fine as well. Sometimes it's hard to fine ciabatta unfortunately. Really though, if you like soups, please try this. It is our go to soup for company and I make it regularly with dinner. You should also know that this is an Ina Garten recipe (Barefoot Contessa on Food Network) and I think that she is ammmmazing. Honestly, I don't think I have ever made a recipe of hers that I haven't liked. I always trust her. And you should too.


Pappa al Pomodoro

1/2 cup olive oil
2 cups chopped onions (2 onions)
1 cup medium diced carrots, unpeeled (3 carrots)
1 fennel bulb, trimmed, cored, and medium diced (1 1/2 cups)
4 tsp minced garlic (4 cloves)
3 cups (1 inch) diced ciabatta bread, crusts removed
2 (28 oz) cans crushed Italian plum tomatoes
4 cups chicken stock
1/2 cup dry red wine
1 cup chopped basil
salt and pepper
1/2 cup freshly grated parmesan cheese

Croutons:
3 cups (1/2 inch) diced ciabatta bread
olive oil
salt and pepper

1.) Heat the oil in a large stockpot over medium heat. Add the onions, carrots, fennel and garlic and cook over medium-low heat for 10 minutes, until tender. Add ciabatta cubes and cook for 5 more minutes. Add tomatoes along with chicken stock, red wine, basil, 1 Tb salt, and 1 1/2 tsp pepper. Bring soup to a boil, lower the heat, and allow to simmer, partially covered, for 45 minutes.
2.) Meanwhile preheat oven to 375 degrees F. Place ciabatta on a large sheet pan and drizzle with olive oil and sprinkle with salt and pepper; toss well. Cook, stirring occasionally, for 20-25 minutes, until crisp.
3.) Beat with whisk to break up bread or use immersion blender to desired consistency. Stir in parmesan cheese and taste for seasoning. Serve hot with croutons.

Wednesday, April 27, 2011

Oatmeal Breakfast Bread


Every once in a while I like to bake something a little bit less decadent and rich, and a bit more healthful. This is a great light alternative when you're not in the mood for something heavy. I love baking quick breads, especially banana and zucchini. I've never tried a simple spiced loaf with dried fruit though. Boy was it fantastic! I spread some softened butter on it and enjoyed a couple slices with my coffee this morning. The texture is pudding-soft at room temperature so be careful not to slice into it before it cools otherwise it might be too soft to handle. I know it's hard when such delicious aromas are wafting through your kitchen, but please try to restrain yourself haha. The topping is not the usual crumb either, not like a streusel. It's just cinnamon, brown sugar and a nut of your choosing (I chose pecans). It creates a perfect contrast of texture, just a slight crisp crunch to go with such a moist bread. Nothing heavy like the topping of a crumb cake, so it is really kept light throughout. What makes this quick bread so unique is the significant addition of applesauce, a technique usually used to cut fat. This doesn't mean that the bread is "diet", but it is certainly a bit lighter in the calorie load since it doesn't use as much oil. I'm not one to complain about saving calories without cutting taste, so to me this recipe is just magical. So if you're interested in trying out a new quick bread, whip this one up!


Oatmeal Breakfast Bread
Adapted from Dorie Greenspan, "Baking From My Home to Yours"

Topping:
1/4 cup light brown sugar
1/4 cup walnuts or pecans
1/4 tsp cinnamon

Bread:
2 large eggs
1 1/4 cups unsweetened applesauce
1/3 cup canola oil
1/4 cup buttermilk or whole milk
1 1/4 cups flour
3/4 cup sugar
1 1/2 tsp baking powder
3/4 tsp cinnamon
1/2 tsp baking soda
1/2 tsp salt
1/4 tsp nutmeg
pinch of ground cloves
1/2 cup dried fruit (figs, apples, apricots or raisins)
1 cup old fashioned oats

1.) Preheat oven to 350 degrees F. Prepare 9x5 loaf pan by buttering and dusting with flour. Put pan on baking sheet.
2.) In a small bowl, using your fingers, toss together the sugar, nuts and cinnamon until evenly mixed. Set aside.
3.) Whisk together eggs, applesauce, oil and buttermilk until well blended.  In a large bowl, whisk together the flour, sugar, baking powder, cinnamon, baking soda, salt, nutmeg, and cloves. Remove 1/2 tsp of the mix and toss it with the fruit, just to coat; set aside. Stir the oats into the bowl of dry ingredients. Pour the liquid ingredients over the dry and, using a large rubber spatula, stir just until everything is evenly moistened.- this is a case in which less is more, so don't overdo the mixing. Scatter the dried fruit over the batter and stir to blend. Scrape the batter into the pan and sprinkle over the topping, patting it down very lightly with your finger so it sticks.
4.) Bake for 55-60 minutes, or until bread is beautifully browned and a thin knife inserted into the center comes out clean. Transfer the bread to a rack to cool for about 5 minutes, then run a knife around the sides of the pan and un-mold. Invert and cool to room temperature right side up.


Tuesday, April 26, 2011

Bacon Ranch Potato Salad

Sometimes I am ashamed to admit that I studied nutrition at college... this is definitely one of those times. I went on bacon overload with this one. Bacon just adds so much flavor that I couldn't resist adding a little bit of the bacon grease to the salad. Not exactly nutritious... but definitely delicious! Of course that is something that you don't necessarily have to do, this salad is great even without the little slip of bacon drippings. It's not the average potato salad either. I'm a big fan of the generic potato salad prepared with hard boiled eggs, celery and onion. Whenever I go to prepare a potato salad for gatherings though, I always feel like people will look at me weird for putting hard boiled eggs or raw onion in it. That's why I try to do something more generic. I know, it's silly to feel that way, lot's of people like the usual potato salad. I just can't shake that feeling though. That's why I like this recipe. Who doesn't like bacon? So if you're looking for an alternative for that get together or even for your own family meal, try this one out. The flavors are great and pleasing for most everyone.


Bacon Ranch Potato Salad

5 lb small red potatoes
1 (1oz) package ranch dressing mix
1 (8oz) container sour cream
1 cup mayonnaise
3/4 tsp seasoning salt ( I use Beau Monde, but you can always season with salt, pepper, garlic powder to taste)
1 bunch scallions
1 (8 oz) package or two cups shredded cheddar cheese
1 lb extra thick sliced bacon, cooked and crumbled

1.) Set potatoes in a pot with cold water that covers the top by no more than an inch. Salt water with 2 Tb salt and boil potatoes until tender. Drain potatoes and let cool until you are able to handle them. Slice potatoes into chunks and place in a large bowl.
2.) While potatoes are boiling make dressing in a small bowl- combine ranch packet, sour cream, mayo and seasoning salt.
3.) Pour dressing over potatoes and add scallions, cheese, and bacon. Stir to combine salad and season if needed. Place in refrigerator for at least 4 hours.

Monday, April 25, 2011

Tiramisu


I have had a raging war with Tiramisu for a long time now. I have tried many times to recreate the Italian classic using recipes that dictate the authentic method and have always failed. Always. For those of you that are unfamiliar, I am referring to the authentic custard that is prepared using mascarpone cheese and egg yolks. I just can't seem to make a good Tiramisu the traditional way. Granted, my standards for myself are pretty high, but I still know when something tastes good and when it doesn't. It wasn't until I made Tiramisu in a completely un-Italian manner that I was utterly satisfied. Yes, that is right, I have made a joke of the Italian's infamous dish by completely Americanizing it. Well the joke is on them!! Because this Americanized Tiramisu is fantastic : D It is exactly what I was looking for in a Tiramisu... an espresso soaking that wasn't straight liquor and a custard that was smooth and perfectly balanced with the dish. And as a bonus it is about a trillion times easier to prepare!! Here I go again though using pre-prepared materials like pudding again. Ugh, I hate it... I wish I didn't have to condone it, but I just have to! When it's good, it's good. I can't deny what pudding mix is capable of sometimes. However, the whipped topping in this recipe... I would looooove to substitute real whipped heavy cream instead, but I am afraid the consistency would actually be thrown off if I did. So, alas, two pre-prepared products in this recipe. I refuse to be ashamed though. This recipe has finally made my dreams of Tiramisu come true, boy has it ever. It's really up to par with the authentic stuff, it truly is. The simplicity to the recipe is perfect for those that love Tiramisu, but don't love the kitchen. And I forgot to mention the best part- I found this recipe in a Cooking Light Cookbook. So, the original recipe actually reads "non-fat sweetened condensed milk", "1/3 less fat cream cheese", and "reduced fat whipped topping". Obviously I left the sugar-free instant pudding the same in the recipe. You really have to because the weight for sugar-free pudding boxes is not equivalent to regular pudding boxes so they are not interchangeable in recipes. Everything else though I used full fat because I want full flavor. I have tried the low fat version though and the taste is about the same, the custard is just less thick. Whatever kind of diet you're on, this recipe will certainly suite you.

Whenever I go to make tiramisu I always have trouble remembering what type of dish works best since I don't own a trifle bowl. Well I finally found a good fit- 9" springform pan. This allows for two layers, using only one package of ladyfingers perfectly. The only problem is that the espresso liquid will leak out of the bottom. However, I didn't find that to be an issue, I just put tin foil around the bottom and set it on a plate in the fridge. The springform pan allowed me to take away the sides which made for a nice presentation. Whatever pan you use is really up to you and will ultimately dictate how many layers you will make so adjust the recipe accordingly.


Tiramisu
Print recipe

1 cup cold water
1 (14 oz) can sweetened condensed milk
1 (1.5 oz) package sugar-free vanilla instant pudding
1 (8 oz) block cream cheese, softened
1 (8 oz) tub frozen whipped topping, thawed (I use "extra creamy made with real cream")
2 cup hot water
1 cup Kahlua (coffee flavored liquor)
2 Tb instant espresso or 4 Tb instant coffee granules
1 package crisp ladyfingers (I use 7.5 oz package Vicenzovo)
2 Tb unsweetened cocoa, divided

1.) Combine first 3 ingredients in a large bowl; stir well with whisk. Cover surface with plastic wrap; chill 30 minutes or until firm (More than 30 minutes and the mixture may be too thick and difficult to blend).

2.) Beat cream cheese in mixer at medium speed to smooth. Add in the pudding mixture, mixing until well blended. Gently fold in whipped topping, set aside.

3.) Combine hot water, Kahlua, and espresso. Dip enough of the ladyfingers into the Kahlua mixture to cover the bottom of a Trifle bowl or dish of choice. Spread half of the pudding mixture evenly over the ladyfingers, then sprinkle with 1 Tb cocoa. Repeat with remaining ladyfingers and pudding mixture. You will have two layers. Cover and chill at least 8 hours. Unmold the springform pan right before serving, using a knife that has been warmed under hot water to run around the edge of the pan.

Saturday, April 23, 2011

Chewy Chocolate Chip Cookies

I've been through a countless number of chocolate chip cookie recipes. There are so many that are great that I can never remember which one I like the best, so I usually just end up cycling through them again and again. As of recently that has come to an end- THIS is my favorite chocolate chip cookie recipe! I like my chocolate chip cookies chewy, not crisp or cakey. This recipe makes an incredibly moist, chewy center and edges that are just crisp enough to add contrast. Yes... this recipe does "cheat" to achieve that perfect texture- it uses a package of pudding mix. Normally I try and do everything from scratch when I can, but I am not too proud to use this recipe, they're just too fantastic to deny. Really, sometimes I can be a yuppy when it comes to baking... (don't ever try and feed me frosting from a can). So I think it is saying something when I use a recipe with pudding mix for such a signature baked good. My favorite thing about this recipe is how moist and fresh tasting the cookies stay after a few days. I even sent some to my brother in Germany and they hadn't even begun to stale when he received them. There really isn't much else I can say about this recipe. Bake them. They will speak for themselves.

These are my cookie baking rules-

1.) Use parchment or a silicone mat (I use the mat).
2.) Make sure they are uniform in size (I use a 1 1/2 Tb scoop).
3.) Put the dough in the refrigerator to firm up before putting in the oven. This ensures that the butter won't melt before the leavening agent (baking soda/powder) has a chance to react. What this will achieve is the perfect cookie shape when baked.
4.) Make sure you always scoop cookies onto a cool pan (I alternate pans).
5.) Dont ever let your cookies cool on the pan! Please transfer them onto a cooling racking with a spatula  a minute or two after they leave the oven (thin metal spatula's work best).


Chocolate Chip Cookies
yield: 3 dozen

2 1/4 cups flour
1 tsp baking soda
1/4 tsp salt
1 cup (2 sticks) butter, softened at room temperature
3/4 cup packed light brown sugar
1/4 cup granulated sugar
1 (3.4 oz) package instant vanilla pudding
2 eggs
2 tsp vanilla extract
2 cups (12 oz) semisweet chocolate chips

1.) Preheat oven to 350 degrees F. Sift together the flour, baking soda and salt.

2.) Cream together the butter, brown sugar, and granulated sugar until light and fluffy. Add eggs, one at a time and mix until well blended after each addition. Add in vanilla. Mix in the dry ingredients just until moistened. Stir in chocolate chips. Drop cookies by rounded tablespoonfuls on cookie sheets lined with parchment or silicone mats.

3.) Bake for 10-12 minutes, until edges are just golden brown.

Friday, April 22, 2011

Buttermilk Biscuits


Since I have moved to Alabama I have been trying to build my experience with traditional southern food. It has proved rather difficult though since, being from Upstate New York, I am just not that into it (grits... yuck). There is one staple that I have grown to adore however- the biscuit. Ohhhhh the glorious layers of buttery flaked dough, SO yummy! I know that there are biscuits up in NY and yes, I have had them, but they were always given to me from a refrigerated tube of dough. Here in the South they whip them up in the kitchen on a regular basis like their preparation is almost a memorized motion. For some, I'm sure that it is. I can see why they are part of the standard diet down here- they are just so darn good! And it is true, after you make them once and see that it wasn't so hard to prepare after all, you'll make them again and it'll just keep getting easier every time. Well, I have tried a handful of biscuit recipes and I have got to say, there is nothing like the buttermilk biscuit. I just love anything with buttermilk. The acidity in the buttermilk always makes the product so tender, it's incredible. Between the tenderness attributed from the buttermilk and the flakiness from cutting in cold butter into the flour mixture, buttermilk biscuits are killer. This is my absolute favorite buttermilk biscuit recipe. I'm telling you, it turns out the most perfect biscuit! And I love that it only makes approximately 6 biscuits, just enough for one meal. You really can't have biscuits the next day, they just don't store well and you'll never have that right from the oven steamy flakiness again. So having a small batch is perfect. If you're having a large group of people over then it can easily be doubled as well. As it is, there are only two of us around my home so even 6 biscuits is more than we can handle (these are nice, fat biscuits). So I end up breaking the batch into 8 servings and baking off 4 right then and either freezing them to store or putting them in the fridge to bake the next day. Let me tell you three VERY important rules about making biscuits though before you start. Number 1- All your ingredients need to be as cold as possible. The flakiness comes from the steam created from the layers of fat melting in the oven. If the fat begins to melt before it hits the oven you will loose some of the flakiness (I always cube my butter and then stick it in the freezer for 10 minutes or so). Number 2- Do not handle your dough more than necessary, the more you mix and knead, the tougher the dough will be. Just mix until it comes together and you will maintain the tenderness. Number 3- when you use the biscuit cutter, do not twist it!!! Cut straight down into the dough and come right back up. You will destroy your layers by twisting. Now that you know the rules there is nothing stopping you from making an incredible biscuit, except for having an incredible recipe. Guess what? Here it is! THE best buttermilk biscuit I have ever tasted... enjoy : )


Buttermilk Biscuits
(adapted from The Clinton Street Bakery by DeDe Lahman & Neil Kleinberg)
yield: 6 biscuits

2 cups all purpose flour, plus more for dusting
2 Tb baking powder
1 1/2 Tb sugar (1/2 Tb equals 1 1/2 tsp)
1/4 tsp salt
3 Tb butter, chilled and cubed (I use salted for this)
3 Tb vegetable shortening, chilled and cut into small chunks
3/4 cup buttermilk

1.) Preheat the oven to 350 degrees F. Place the 2 cups flour and other dry ingredients in the bowl of an electric mixer. Mix on low speed with the paddle attachment until combined. *
2.) Add the butter and shortening to the bowl and mix on low speed until the dough reaches a crumbly texture. The butter and shortening should be the size of peas.
3.) Turn off the mixer and add the buttermilk to the bowl at once. Mix very briefly on low speed until the dough just comes together (takes less than 10 seconds).
4.) Turn the dough onto a floured surface and form it into a ball. Lightly knead two or three times until combined.
5.) To bake the biscuits the next day, dust a sheet pan with flour and refrigerate, covered with plastic wrap, overnight. Then bring the dough back to room temperature.
6.) Pat out dough to a 3/4 to 1 inch thickness. Shape dough into a rectangle, making the sides high. Using a 2 inch round cutter, cut out 4 biscuits. Place them on a sheet pan lined with parchment paper and dust with a sprinkling of flour if desired. Form the remaining dough into another rectangle with high sides and cut out two more biscuits.


7.) Place pan in oven and bake 15 to 17 minutes or until biscuits are golden brown and cooked through. Serve warm.

*If you do not have a mixer you can cut the butter and shortening with a pastry cutter or even your hands. Work very quickly if using your hands as to not melt the fats.

Wednesday, April 20, 2011

Easter cupcakes!

Today I had the wonderful opportunity to decorate Easter cupcakes with my friend and her adorable 2 year old daughter : ) It was fantastic having a little helper in the kitchen! I can't wait for my baby girl to be old enough to be my little sous chef hehe We had an array of Easter candy to choose from including jelly beans and the infamous marshmallow Peep. Here is a picture of the fantastic job she did decorating her cupcakes- boy, did she like those jelly beans! haha


Anybody that bakes has a stand by cupcake recipe that they use when they set about the task. I like to try out different recipes though. I have a cupcake recipe that is always great, but I am searching for one that is fantastic. These were a yellow buttermilk cupcake- not bad, but not great. The batch was way too large than I could ever possibly handle on my own and the cake wasn't as moist as I like them. Still perfectly edible and good eats though. However, since I was not impressed I will not be sharing the recipe with you. What did impress me was the frosting. It was just so incredibly silky and smooth. THAT I would like to share with you. Usually when I make frostings I make a ganache, chocolate buttercream, or the always amazing cream cheese frosting. I usually steer clear of the ordinary vanilla buttercream that is made so simply with butter, confectionary sugar and vanilla extract. It is just too reminiscent of the canned frosting for me. This cupcake recipe suggested a swiss meringue buttercream, so I thought "why not make the attempt?". To familiarize those of you that don't know, a swiss meringue buttercream is made by first dissolving granulated sugar in egg whites over simmering water and then beating them to stiff peaks, followed by the gradual addition of butter. Sounds fancy and labor intensive, right? I always thought so too and that's why I have stayed away from such a task. But since I have been going into uncharted territory in the baking arena lately, I went for it. Honestly, it wasn't as hard or long of a process as it seems and the results are so worth the little extra work. This frosting is nothing like an ordinary buttercream! It reminded me of the buttercream that was on our wedding cake. I assume that this was the technique the pastry chef must have used. At the time I wondered how she managed the consistency. I thought maybe it was whipped heavy cream, that's how light it was. That is really the best way to describe it- light. So delicate and velvety smooth. I am a big fan and am happy to say I now have 4 stand by frosting recipes for my cakes. I am still searching for that drop dead cupcake recipe though!


Swiss Meringue Buttercream
yield: 5 cups

5 egg whites, at room temperature
1 cup plus 2 Tb granulated sugar
pinch of salt
4 sticks (1 lb) butter, at room temperature, cut into tablespoons
1 1/2 tsp vanilla extract

1.) Combine egg whites, sugar, and salt in the heatproof bowl of a stand mixer set over a pan of simmering water. Whisk constantly by hand until mixture is warm to the touch and sugar has dissolved (the mixture should feel completely smooth when rubbed between your fingertips).

2.) Attach the bowl to the mixer fitted with the whisk attachment. Starting on low and gradually increasing to medium-high speed, whisk until stiff (but not dry) peaks form. Continue mixing until the mixture is fluffy and glossy, and completely cool (test by touching the bottom of the bowl), about 10 minutes.

3.) With mixer on medium-low speed, add the butter a few tablespoons at a time, mixing well after each addition. Once all butter has been added, whisk in vanilla. Switch to the paddle attachment, and continue beating on low speed until all air bubbles are eliminated, about two minutes. Scrape down sides of bowl with a flexible spatula, and continue beating until the frosting is completely smooth. Keep buttercream at room temperature if using the same day, or transfer to an airtight container and refrigerate for up to 3 days or freeze up to 1 month. Before using, bring to room temperature and beat with paddle attachment on low speed until smooth again, about 5 minutes.

*Adapted from Martha Stewart Cupcakes*

Tuesday, April 19, 2011

Oreo Cheesecake Cookies

I have been dying for anything with cream cheese in it lately, but I didn't want to make a whole cheesecake for just myself... knowing me the whole thing would be gone in three days. So when I found this cookie recipe I went right to baking! It fit my craving perfectly because it only makes about a small batch of cookies, just enough for me to tackle with my coffee the next few days : ) And who can deny the sheer appeal of Oreo's? Not me! Well, let me tell you, these cookies did not disappoint. They came together very quickly in my mixer and almost didn't make it to the oven. Some of them didn't! There are no eggs in this batter so the cookie dough is up for grabs- Mmmmmm, cookie dough.... hehe An even better idea came across me while preparing the dough- why not freeze the cookie dough into balls and you would have almost an Oreo cheesecake truffle. So that is exactly what I did with half the batter and came up with two recipes for you- Oreo Cheesecake Cookies and Oreo Cheesecake No-Bakes. You can literally make them into decadent truffles by dipping them in melted semisweet chocolate after freezing and setting them in the refrigerator to harden- voila! What a perfect no bake dessert. This reminded me of the Oreo truffles you can make with  just a package of Oreo's and a block of cream cheese, which is pretty delicious as well. Honestly, these are better. Plus! You have the option of baking them and making them ooey and gooey. However, there is just a smidge more to do than just mix cream cheese and a package of cookies together, but not by much! You can't go wrong either way, this is just such an easy recipe and is incredibly delicious. If I had to decide if they were better baked or frozen, I would definitely have to say frozen. Not only was there one less step involved, but they were just so luscious and cheesecake like that I couldn't stop popping them in my mouth. They were still great baked though! The Oreo chunks in the baked dough were almost like what you get after dipping your Oreo's in milk, moist with a very slight crunch- soooo good! Be sure to let them cool completely though, they are much better that way. It totally just depends what you are in the mood for. I have to credit this adaptation to another amazing baking blog that I follow- the brown eyed baker. What a terrific find!


Oreo Cheesecake Truffles
Print Recipe
(This is my preferred method for this cookie)

Yield:  Approximately 2 dozen

½ cup unsalted butter, at room temperature
4 ounces cream cheese, at room temperature
1 cup granulated sugar
1 teaspoon vanilla extract
1 cup all-purpose flour
½ cup semisweet chocolate chips (mini* or regular)
1/2 cup chopped Oreo cookies (with creme), plus 1 cup crushed Oreo crumbs (without creme)
1. In a mixing bowl, cream together the butter and cream cheese on medium speed until smooth and well-combined.
3. Add the sugar and vanilla extract and mix until the ingredients are well-combined. Add the flour and mix on low until the flour is incorporated. Stir in the mini chocolate chips and chopped Oreo's with a rubber spatula.
4. Place the Oreo cookie crumbs in a small bowl. Scoop the cookies into about 1½ to 2″ balls and then roll in the cookie crumbs. Place the cookie balls on a sheet pan and cover with plastic wrap then place in the freezer until set.
*I would use mini chocolate chips for this


Oreo Cheesecake Cookies
Print Recipe
Yield:  Approximately 2 dozen


½ cup unsalted butter, at room temperature
4 ounces cream cheese, at room temperature
1 cup granulated sugar
1 teaspoon vanilla extract
1 cup all-purpose flour
½ cup semisweet chocolate chips (mini or regular*)
1/2 cup chopped Oreo cookies (with creme), plus 1 cup crushed Oreo crumbs (without creme)
1. Preheat oven to 350 degrees F. Line a baking sheet with parchment paper and set aside.
2. In a mixing bowl, cream together the butter and cream cheese on medium speed until smooth and well-combined.
3. Add the sugar and vanilla extract and mix until the ingredients are well-combined. Add the flour and mix on low until the flour is incorporated. Stir in the mini chocolate chips and chopped Oreo's with a rubber spatula.
4. Place the Oreo cookie crumbs in a small bowl. Scoop the cookies into about 1½ to 2″ balls and then roll in the cookie crumbs. Place the cookie balls on the baking sheet. Bake for 12 to 15 minutes, or until the edges are golden and the tops are slightly puffed.
5. Cool on the pan for 2 minutes before transferring to a wire rack to cool completely. Store in an airtight container.


*I would use regular chocolate chips for this

Sunday, April 17, 2011

Homemade Granola

As much as I love dishes that are just decadent with their buttery and sugary goodness, I enjoy adding a bit of nutrition into my diet as well. I start every morning with my own granola recipe. It is highly nutritious and even more delicious. It is high in fiber and contains a ton of omega's (healthy fat).  It's an excellent source of other various vitamins and minerals as well, such as vitamin E and Folic Acid.  The texture is not like the kind of granola you can buy at the store- it is far superior. It's chunky and crunchy with a slight chew, not overly crumbly and not uniform throughout. You can snack on it plain or you can toss a handful of dried fruit in it when you serve it. However, be advised, if you package it with dried fruit it will loose it's crunch. It tastes great dry, but I always eat it with yogurt (a genius combination of a container of 0% greek yogurt for protein and a container of low fat french vanilla yogurt for taste). The best part of this recipe is that it is completely adaptable. If you don't have any fiber one cereal, just use 8 cups total oatmeal.  OR if you can't find oat bran, just use enough wheat germ and flax seed to total 3 cups. You just have to follow the basic formula and you can adjust it as needed or wanted. You can even have some fun with it and use 1 TB maple extract instead of vanilla to make a maple flavored granola or instead of simply cinnamon use pumpkin pie spice. It is completely versatile and makes a great big batch so it'll last you quite a while, unless you're like me, in which case it might last you two weeks haha.


Homemade Granola

2 cups rolled oats
2 cups fiber one cereal bran sticks (one sleeve's worth)
1/2 cup milled flax seed
1/2 cup wheat germ
1/2 cup oat bran or regular bran
1 1/2 cups variety chopped nuts (walnut, pecans, or almonds)
1/2 cup canola oil
1/4 cup plus 2 Tb honey
2 Tb REAL maple syrup (preferably grade B)
1/4 cup dark brown sugar (light will work fine too)
2 tsp salt
2 tsp vanilla extract
2 tsp cinnamon


1.) Preheat the oven to 325 degrees F and prepare 2 sheet pans with parchment paper (if you use aluminum foil it will stick to the granola when it cools). Mix the first 6 ingredients in a large bowl.


2.) Mix all but vanilla extract that remains for ingredients in a small saucepan and bring to a boil over medium heat. Turn off heat and add vanilla, stirring one last time. Pour the syrup mixture into the dry mixture and stir until everything is moistened.


3.) Spread evenly between the two pans and place in oven to toast for 20 minutes. Take the pans out after ten minutes and toss the granola then pat back down rather firmly. Return to oven for remaining ten minutes.


4.) Once the mixture comes out allow it to cool completely before breaking it into chunks.

Saturday, April 16, 2011

Welcome

I would like to welcome you all to my blog : ) This is the first attempt I have ever made at such a thing, usually I don't care enough to keep my Facebook status updated even. However, I've been looking for a new hobby and had a revelation the other day and said to myself "why not chronicle my excessive love of food?" To be more specific, desserts of all kind. Sure, I love savory food, the everyday meal, but I find that it's dessert that can really make things special. Whether it is a fancy cake after dinner or a simple blueberry muffin with your morning coffee. I love it all and I love trying new recipes and sharing the really fantastic ones with others. Thus, the purpose of my blog. I am going to write about my exploits in sweet delicious food and share photos and recipes with anybody that cares to have a look. To change things up a bit every once and a while I will even throw a savory recipe or two at you. I think I might even throw my two sense at you about nutrition. I studied nutrition for two years at SUNY Plattsburgh before postponing my education to run away and get married to a military man (whom I love oh so much and have an amazing baby girl with). I don't regret any of it, but have since gone in the opposite direction and taught myself to bake and cook not only healthy dishes, but decadent ones as well. So here it goes for those, like me, that don't eat to live, but live to eat (as the phrase goes haha).

I am going to start things off with the most recent recipe I have tried and found incredibly successful- Moo-less Chocolate Pie  by Alton Brown found in "Food Network Favorites". Now I found this particular recipe interesting because of the peculiar ingredients. Normally a chocolate pie consists of a crust of sorts and then a chocolate pudding filling. Pudding is made through thickening milk or cream with sugar and egg yolks. As you can infer from the title of this pie, there is indeed no dairy, which would make this particularly pleasant for vegans. Instead of the traditional dairy pudding, the recipe transforms melted semi-sweet chocolate into a creamy chocolate pudding mixture with silken tofu. "Tofu?" You are probably thinking that doesn't sound so appealing, especially if you have never tried tofu. Well let me just tell you, the most important thing you need to know about tofu is that it takes on the flavor of the recipe that it is used in. So in essence this recipe is GENIUS. Swapping cream and egg yolks along with a hefty amount of sugar for basically chocolate chips and tofu while still coming up with just as delicious a result ? It's unbelievable. I am telling you this recipe is so luscious and oh so smart! You have got to try it. Not only does it make the dish that much more nutritious, but the method is so simple. With a pre-made chocolate crumb crust (I used Oreo) and the use of a food processor, I had this pie whipped up in less than 15 minutes! How awesome is that? Here are a couple side notes I have about making any changes to the recipe. You should use a good quality semisweet chocolate chip (I would use Ghiradelli or Callebaut), but if you are vegan you are obviously going to want to use vegan chocolate chips. Also for vegans, if you choose to put the mixture in a crumb pie, you'll have to make your own crust with vegan butter and crushed vegan chocolate cookie crumbs. If you don't feel like going to the trouble, the mixture would also make a fantastic pudding all by itself.

So again, welcome to my blog and I hope you enjoy it as much as I do!!

Moo-Less Chocolate Pie


2 cups (12 oz) semisweet chocolate chips
1/3 cup coffee liqueur (some strong coffee will work just as well I am sure- coffee enhances the flavor of chocolate)
1 tsp vanilla extract
1- 16 oz block silken tofu
1 Tb Honey
1- 9 inch chocolate wafer crust

1.) Place a small metal or glass bowl over a saucepan filled with simmering water. Melt the chocolate chips and coffee liqueur in the bowl. Stir in the vanilla.

2.) Combine the tofu, chocolate mixture, and honey in a food processor. Blend until smooth and liquified.

3.) Pour the filling into the crust and refrigerate for 2 hours, or until the filling is set. Serve with whipped cream if desired.

Source: Alton Brown, "Food Network Favorites", 2005.