There are SO many reasons you should make your own butter! The most important being that YOU made it. I think that whenever you can make something from scratch the end product is almost always better than the prepackaged version. Not only is it usually more delicious, but you know exactly what went into it- no preservatives, no gums, no colors or dyes. Plus with butter, you can go organic for half the price of buying it from the store. I made homemade butter for the first time a couple weeks ago and was amazed at how easy it was to do. If you have 15 minutes, some heavy cream and a mixer, you can make homemade butter. Well, I thought it was so fantastic that I decided to take it one step further and create a homemade olive oil butter : ) I wanted to create a replacement for those butter spreads you can buy at the store which claim to be made with certain oils or added good fats. If you ever take a close look at those, almost always the first ingredient listed is water. For those of you that don't know, they list ingredients on packages in order of how much of that ingredient is used in the product. In this case, water is the ingredient that is used in the largest quantity in butter spreads. The oil blend they use is usually some compilation of soy and vegetable oils. By making an oil butter spread yourself you can control how much and what kind of oil is in the butter. You don't even need to used olive oil, you can use canola oil for a less distinct flavor or a different blend of fats. You can use more or less oil depending on your preference for taste and consistency. What I want to do for you is show you how this can be done by giving you a short tutorial on butter making and an outline of a recipe for olive oil butter that I came up with. The beauty of it is that you can adjust it to your liking as I mentioned above. Just remember, this is a butter "spread" meaning that you should NOT be using it in baking. It is primarily meant for spreading on breads or vegetables. Although you could probably use it to saute as well. Also, be warned that this is not a "diet" or "low calorie" butter spread. It is simply a way to bump up the nutrition in homemade butter without losing the taste. Don't be intimidated either. I promise, this is easy! And it is so worth your 15 minutes. So let's begin!
Have you ever whipped heavy cream before? Now start the same way, but let's overbeat that cream and make some delicious butter!
Pour two cups of heavy cream in the bowl of a mixer and start to beat on high with whisk attachment.
This is usually about where you would stop for a stiff whipped cream, now let's keep beating...
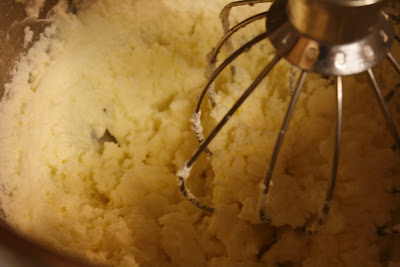
Now it's getting thick and lumpy... keep going!!
Here we go- you should start to see some curds develop. Not there yet though, keep going!
Aha! The butter fat solids are separating. If you lift up the whisk you should see...
a pool of buttermilk! Detach the bowl from the mixer and dump out the buttermilk carefully, making sure to not lose any butter solids. Put the bowl back on the mixer and keep going!
Alright, here we go, now the butter solids have come together around the whisk. Dump the buttermilk again and start beating the butter solids once more, dumping and beating until no more buttermilk appears.
If you have beaten all the buttermilk out of the solids you are now ready to switch to a paddle attachment and cream in some oil. On medium-low speed, cream in 2 Tb of oil, pouring slowly into the bowl in a steady stream. Add salt if desired. The result will be a beautifully creamy butter.
Scrape the butter into a container of your choice. Now spread it on some bread and enjoy the bliss!!
The spread will harden in the refrigerator so if you want a spreadable consistency, you'll have to bring it out of fridge and leave it at room temperature when desired.
Homemade Olive Oil Butter
Yield: approximately 1 cup
2 cups heavy cream (organic for organic butter)
2 Tb extra virgin olive oil (or a different oil of your choice; you can also add more oil if desired, just add it slowly so you don't accidentally make oil soup).
3/4 tsp salt (optional, add as much to as little as you want. I like this range though)
1.) Pour 2 cups heavy cream in the bowl of a stand mixer fitted with a whisk attachment. Start beating the cream on low, bringing it up to high. Continue beating until curds develop and butter solids start separating from buttermilk. Pour off buttermilk from the bowl and continue to beat and pour until no more buttermilk develops (whole process should take 7-9 minutes). *
2.) Switch to paddle attachment and begin to cream butter. Slowly, in a steady stream, add 2 Tb of olive oil (feel free to add more or less to your liking). Add salt, if desired. You should be left with a creamy butter spread.
*Be careful, the mixture sloshes quite a bit once the buttermilk separates. I usually place a kitchen towel over the mixer once this begins.


I'm thrilled to find this recipe! I didn't want to start with prepared butter but with heavy whipping cream instead. Can't wait to get to it first thing tomorrow!!
ReplyDelete